Monday 29 December 2014

my first publication!

I am excited to share that my thesis work has been published!  This work was a collection images, sewn on to tea dyed silk.  The images were from my collection of photographs that I have taken in my travels.  My concept is focused on human interconnections.  I am hoping that the viewer is intrigued by the work and is drawn towards 'the other', thus lessening the distance between the other and the self.
here are a few small sewn pieces that I mounted in shadow boxes

These were larger elements of the installation, hung from the ceiling

close up view 

another close up view

If you would like to read the published article about this body of work:  feel free to follow the link below.


Thursday 11 December 2014

The celebration of lights

You may remember that in the summer I created a bird feeder out of this beautiful stone
 that was being pulled out of my friends basement.
 Their entire cottage is built on this sparkly rock.
In honour of the season, I created a menorah for them.

A menorah is traditionally used for the holiday of Chanukah in the Jewish tradition.  It honours the eight days of light that was created with a tiny bit of oil that should have only lasted a few hours.  A candle is added and lit every day for the  eight days of the holiday.
 And so, as we approach the festive season,  whether we are either lighting our menorah candles or our lights on our Christmas trees, or being led by the light of Rudolph's nose, or the lights of other traditions...may we all have the light of kindness and wisdom for now and for the future.  May we connect with each others traditions with this shared light, and find a way to illuminate our common ground.

Saturday 22 November 2014

mixed media mini gift cards

Recently I have participated in a conversation with other creative souls
 and it led to an exploration of 'stuckness'.
Fortunately or unfortunately, I have, to date, never had this issue.
Mine is the opposite:

I have so many ideas floating in and out of my head,
 especially when I am supposed to be sleeping peacefully!
 I lay, awake, thinking ....but what if I did this??? or tried that????

Recently, my solution to this A.D.D.'ish challenge was
 to create a series of mini gift cards to try and exhaust my 'what if's'.
Unfortunately, or fortunately, ideas and explorations
 beget more ideas and explorations...
 I made over 100 cards!

I included this picture since in it you can see my beloved Bernina! 

Luckily, my guild recently had a show,
 and so I had the cards for sale in the gift shop.


If the idea of exploring mixed media techniques intrigues you,
 I would encourage you to check out your local stationary store.
Often they have overstock of plain cards and envelopes that they sell off very cheaply.
 Good paper stock is essential.


Sunday 2 November 2014

baby bliss

Dying Fun

Recently I was lucky enough to travel to Israel to meet the newest member of my extended family.  As it happens he is this most adorable red head!  Open hearted and full of curiousity, it was a joy to be with him.  In his honour, I created several dyed 'onesies' that I bought prepared for dying from Dharma Trading:
http://www.dharmatrading.com/
It is so much fun to dye clothing that has already been sewn and prepared for dying.  All that is left is choosing the colours.  He just turned 1 year old but I bought him size two since he is such a big healthy guy!

Discovering Nana's Canadian pine cones!

Wednesday 22 October 2014

new publication

Exciting News


Great news!  A new quilting book is about to come out on the market, and I am so pleased to have had some of my work be selected!  I haven't seen the book yet, so am not sure what was finally chosen but am excited to find out.  Apparently they will be selling at the Houston Quilt festival show and it can also be ordered on line.

This is a link to the publisher's site if you just can't wait to get a copy of your own!


Tuesday 26 August 2014

Sailing


Wall hanging for Newlyweds


Detail

Recently my nephew was married in a beautiful garden wedding with an arbour trellis covered in flowers as his wedding canopy.  Simply and naturally beautiful.


 As they didn't need a canopy made by me I decided to get creative and work with a favorite photo of the newlyweds.  This photo was taken before they were married, at one of the family's favorite places in the world.  Our beloved Lac Notre Dame in the Laurentian mountains of Quebec.  My nephew shows off his ability to multitask, sailing while kissing.


 Working with the photo in photoshop, I changed it to a black and white image, printed it onto watersoluble paper and then free motion stitched the highlights.  I had asked the young couple to send me some fabric that was meaningful to them.  They sent this lovely batik that was aquired while travelling.  I used it for the framing fabric, keeping the dark shades at the bottom and the lighter ones at the top.  They sent a pretty burgandy blouse and I used a piece of that for the rod pocket.  A piece of the wedding dress was used to stabilize the image as I was sewing through silk organza.

After it was all put together, I decided to do a little hand stitching to add texture.  The browns and dark greens in the distance are to suggest our evergreens in the mountains that surround the lake, and I stitched a bit of bright blue into the lake.  In this close up you can see the free motion stitching of her hair and bathing suit.


Wednesday 30 July 2014

ceramic experiments

My last term at school I decided that I couldn't leave without trying my hand in the ceramics studio.  After all, during my years there, I had been in the woodworking, jewellery, metalsmithing and plastics studios  (not to mention my home base;  the fibre studio).  
In the ceramics studio  I learnt about moldmaking and surface design and I created these oddly shaped little vases from a mold that I had made. 
My friend fell in love with their quirky look and chose to use them for her Ikebana show.  I think she came up with a wonderfully creative job of enhancing their off centre playfulness.

Sunday 27 July 2014

a new twist on 'for the birds'

Creating a bird feeder from found objects


For documentation purposes, the bird feeder is hanging off my back porch for these photos but it 's ultimate destination is the north country of beautiful Muskoka.


Recently we were invited to a very beautiful cottage of friends and they described the fact that they are digging out the basement to create more living space but it has been tough, slow work because the ground is rock.  Of course I had to check this out and found that it is not just plain rock but beautiful quartz looking granite.  Or, it might be granite looking quartz.  Either way I just had to find a way to help them see how beautiful their stone is.
I decided to create a bird feeder and enjoyed learning how to drill through the stone with a diamond bit, on the angle  (to create the neck of the bird), as well as to  create the teepee under which the bird feed will be placed-hopefully.

here's a close up of the area for the feed.  The brass rod is left over from another project.  The  angle of the rod against the weight of the stone is enough to keep the stone up.  Physics-who knew?  But I nailed down the pieces of wood around the perimeter so that the seeds don't fall off the platform.  I am proud to say the entire project is made of found objects.  Nothing was bought except the diamond drill bit !  (and that i will definitely use that again, because I have a few more pieces of this stone and a few more ideas I would like to try.  If you have any suggestions, feel free to let me in on them.  I have a drill and now know how to use it!

Tuesday 1 July 2014

Wedding Canopy


The Creation of a Wedding Canopy!


My First step was to create the surface design.  The bride and groom met with me and explained that they wanted a very nature oriented theme with favorite colours of greens, blues and purples. I dyed the cotton and then added layers of fabric paint.  this area represented the river that ran through the centre of the design

Eventually I was satisfied with the three main swaths of colour. Blue to represent the sky, deep green with white swirls for the river, and a brighter green in the bottom for the foreground, to represent the land.

I created prints from my drawings and these became thermofax screens.  The bride's favorite flower is the Iris, and her favorite colour is purple so the land in the foreground was covered in printed purple Irises.

A view of the top piece laid out on the dining room table


some views of the printed iris flowers.  The grasses were painted on with a brush.
An image of the deer after quilting as seen from below as it is hung outside.  The shadow was painted into the river.All the quilting was free motion work with various threads.

The groom's middle name is Tzvi which means deer in Hebrew so he requested a deer on the canvas.  This was hand painted on with the fibre paints and dyes.  Of course I felt there needed to be at least 2 deer since we are celebrating the union of a young couple after all!  They are walking towards each other on the edge of the river.


The bride and groom chose the phrase, the font and its size.  I created a thermofax screen for each of these words which are placed amongst the irises in the foreground

Much to my surprise, after the quilt was constructed, I found out from the family, that they wanted the wedding canopy to stand on its own.  I had assumed that they would choose four people to hold the poles but you know what they say about a person who assumes.....
So...it was back to the drawing board, brainstorming, gathering suggestions from near and far, bringing in consultations from florists, and friendly engineers.  The results of all these consultations was that I was totally overwhelmed and confused.
Finally, I decided on buying 4 planting urns, 18 inches high,  used construction bricks teepee style inside the urns to keep the poles in the center of the pots and upright, while we poured cement into the pots about half way up.  The poles were over an inch in diameter from the hardware store.  I had spray painted them white and screwed an eye hook into the top.   This is the test on my driveway to make sure the poles wouldn't snap from the pressure of the quilt on the top.


Installation day....otherwise known as THE WEDDING DAY!  We arrived very early, stepladder in hand, I wanted plenty of time to get it right. 

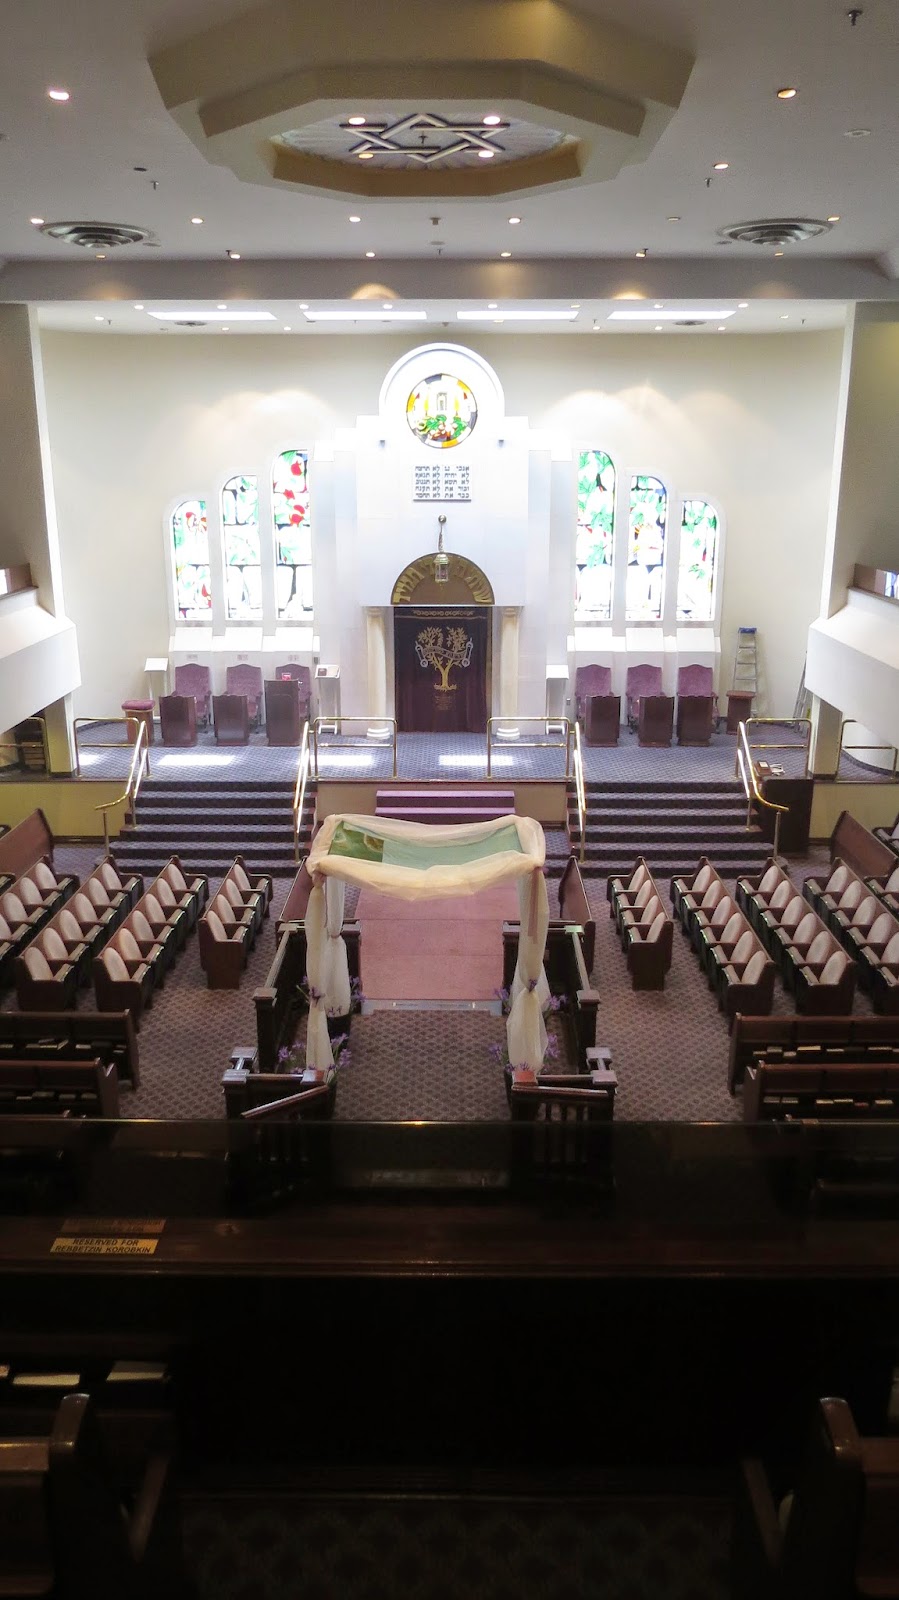
The bride and groom wanted the canopy to be in the center of the sanctuary rather than on the front on the elevated platform.  They wanted to be close to family and friends.  This area was much smaller than the front but we felt confident that it would be enough room.


The first step was to erect the quilt.

But then I felt that without people holding the poles they looked a bit plain so I bought 75 feet of silk organza to drape around the poles and around the perimeter of the canopy

Feeling somewhat relieved that it all came together.


Detail of the finish of the organza in the pots, and I bought Irises to tie in with the prints on the quilt.  Too, the irises are the bride's favorite and I thought that they finished off the pots in a pretty way.

View from the front of the sanctuary.


View from the aisle


Views from the nosebleed sections


Finally !  The Ceremony!  Groom and his mother see the Canopy for the first time and give me the eye.


A beaming mother.


The bride sees the canopy for the first time.

She seems quite taken with it.

Alls well that ends well.  It was a beautiful ceremony and a great party! May they have many many years of health and joy!